The first thing at the top of our screen is a picture of a pizza. Let's see how to load and display that image. Here's the image I used:
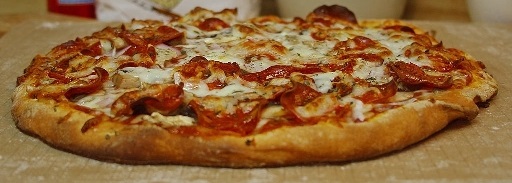
Pizza!
If you have another image you like better, feel free to use it. To use this one, just right-click it and save the image to your program folder. Its name here is L08-06.jpg, but you can rename it if you want a more descriptive name. If you change it, just be sure to use the new name in the program.
One more organizational note before we get the image (last one, I promise!): In order to keep our makeContent() method from getting too big, we're going to make a separate method for each of the five layout regions, which we'll call from makeContent(). Let's make the names simple to remember: makeNorthRegion(), make SouthRegion(), and so on. Since we're getting ready to work on the north region, let's add a call to its method in makeContent():
Right after makeContent(), add the new method:
Now, since we're only putting one item, an image, into the north region, we don't need to use a layout manager in that region. We can add the image directly to the content pane.
Java has several ways to load and display images. Since we're not going to do anything fancy with this image, I'm going to show you the easiest way I know. It's almost a one-liner. Here's all we need to add to makeNorthRegion():
TQA-22 --- It turns out that Java labels (JLabel objects) are pretty flexible and can hold not only text but also images in the form of icons (ImageIcon objects). It also comes in handy that the icons in Java are flexible and can hold almost any image. The first line above creates a new label named imgLabel, and instead of putting text into the label, it creates an ImageIcon by giving it the file name of the image we want to load. If the image were in another directory, we could still load it by using its full path in place of its name above. The last parameter in the first line tells Java that we want to center the image in the label.
Once the label has the image, we just have to add it to the content pane's north region. That's what the second line does. If you run the program now, you'll see this:

Pizza in a window
If you see something else, let me know in the Discussion Area and I'll help you fix it.
That takes care of the north region, so let's move on to the west region, which will contain radio buttons to select the pizza crust. Radio buttons are small buttons, usually round, that allow you to choose one option from a group. They get their name from the way buttons on a radio work, selecting one station and turning off all the rest. Clicking a radio button selects (or turns on) that option and deselects (turns off) all other buttons in the group.
In addition to the buttons themselves, we'll need a group to tell Java what buttons go together. We will also put a border around them that will serve two purposes: It will provide a visual boundary to separate these buttons from the rest of the window, and it will allow us to add a title that describes what's inside the border.
Since all of these components need to go into a region that only accepts one item, we have to create a panel to hold everything. And that panel will need a layout to organize its components. We want the buttons to line up vertically, so we'll use a BoxLayout with a vertical axis.
That's a lot to take in, so let's go through it one step at a time.
The first thing we'll add to our code is a call to the method that will build the western region. That call goes into our makeContent() method, right after the call to makeNorthRegion(), and it looks like this:
Next, we'll add the new empty method to our program:
The first two lines of the method will create a panel to work in and assign a layout manager to it. We've done this before, so I won't explain again in detail. This is what these lines look like:
TQA-24 --- Next, we'll create a border for the panel. Borders are very helpful in organizing a window visually, and Java makes them easy to create. There's a Java class called BorderFactory whose only purpose is to create borders for us.
We can create several types of borders, including etched borders, beveled borders, empty borders, line borders, and titled borders. There are even more, but we won't get into them here. Sun has an excellent tutorial on borders, and I've included a link to it in the Supplementary Material section at the end of this lesson. If you want to know more about borders, check it out.
We're going to use a basic titled border with its default settings, which include a line and a title. Here's the Java statement that creates it for us:
Every Swing component has a setBorder() method, so it's easy to establish the border for our panel. We use BorderFactory's createTitledBorder() method to create the border we want and give it the text to display. Creating a border is that easy.
The last thing to do before we start creating the buttons is to create the button group we want to add them to. The group tells Java what buttons are related so that Java knows which ones to turn off when a user clicks another button in the group. Creating a button group is also easy:
Now we're finally ready to create our radio buttons. As we make each one, we'll add it to both the group and the panel like this:
The first line creates the radio button and gives it the text to display. It also tells Java whether the button should be selected or not. If the second argument is true, the button will be selected when it is created. If the argument is false, it will not. Remember that only one radio button can be selected, and in this case, it will be the first one. All the other radio buttons will need to have an argument of false.
The second line above adds the button to the button group, and the third line adds it to the panel.
Using that as an example, I'll let you write the code for the other three radio buttons on your own. When you finish those, there's one more line to put at the end of the method: the line that adds the panel to the west region of our content pane. That line is similar to the one we used to add the image of the pizza to the north region, so I'll let you add that one yourself, too.
When you're done, you can compare what you've written to my version of the makeWestRegion() method here.
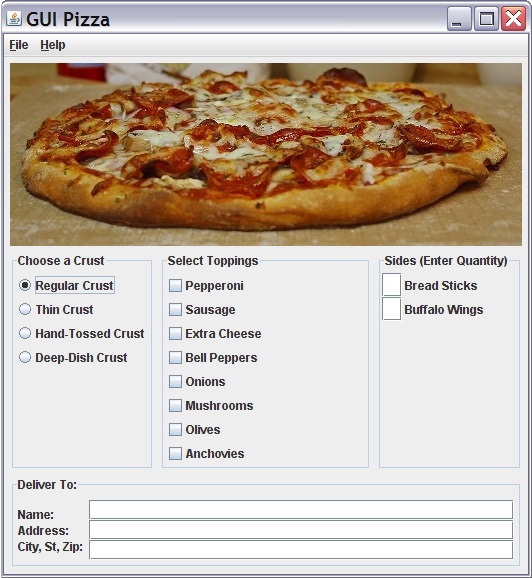
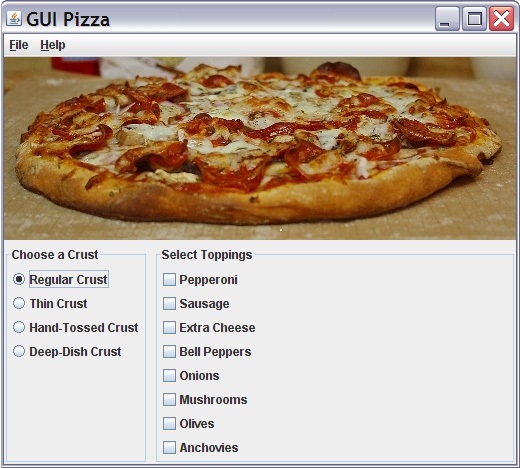
Try running your program now. It should look something like this:
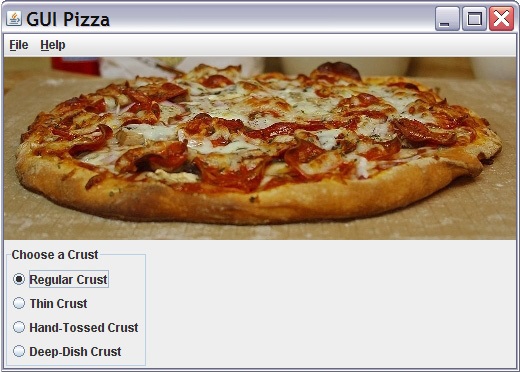
Window with radio buttons
If you see something else, let me know and we'll compare notes.